Back to School: Graduating from the Getting Started Guide
Beyond the Basics: A Guide to the Command Line and Data Management
- Aug. 18, 2025 by
- Paul Marshall
You've read the Chameleon Getting Started guide and might be wondering: what comes next?
First, give yourself a high five for completing the first step.
Now, let's get back to school and dive a little deeper, moving beyond the basics. We’ll use some pre-populated credential files to interact with the API from a Chameleon instance and then we’ll download a set of application credentials to interact with it from our laptop. Then we’ll leverage tools on Chameleon images like rclone and cc-snapshot to securely save and manage your data.
By the end of the Getting Started guide you've launched an instance, allocated and attached a floating IP, and signed in via SSH as the cc user (the default user on Chameleon-supported images). If you've read some of our previous posts like Leveraging New and Improved Chameleon Images, which discuss the contents of a Chameleon image, you'll know that we include a few special ingredients to make life with Chameleon a bit easier.
API Authentication
One of those ingredients is a credential file named openrc that you'll find in the home directory of the cc user. The openrc file contains credentials you need to interact with the Chameleon OpenStack APIs. This lets you level up from using the web interface to the command line or Python, where you can inspect resources in more detail and begin scripting against Chameleon.
To use it you need to source the file:
source ~/openrc
After that you'll be authenticated so you can use the openstack cli (pre-installed in Chameleon images) for interacting with the APIs. One thing to note: the credentials in the openrc file are only valid for 24 hours once they have been generated. After that you may see an error like Could not recognize Fernet token (HTTP 404). If your credentials expire, simply run the cc-generate-openrc command to generate a new set, then source ~/openrc again to use them.
You can explore more about the node you are on:
openstack reservation host show node id
List different images you could launch:
openstack image list
And many, many more tasks that we’ll leave as an exercise to the reader.
The openrc file and pre-installed OpenStack commands in Chameleon images are handy when you are SSH'd into an instance. However, given that instances are somewhat ephemeral with time-bound leases and your laptop isn't, you may also want to have a set of credentials locally and install the OpenStack clients on your laptop. This allows your laptop to function as a "control center" for Chameleon resource interactions. You can develop and execute your workflows from your laptop against different Chameleon regions to meet your infrastructure needs. The best way to grab a set of credentials for your laptop is to login to the web interface and browse to Identity -> Application Credentials.
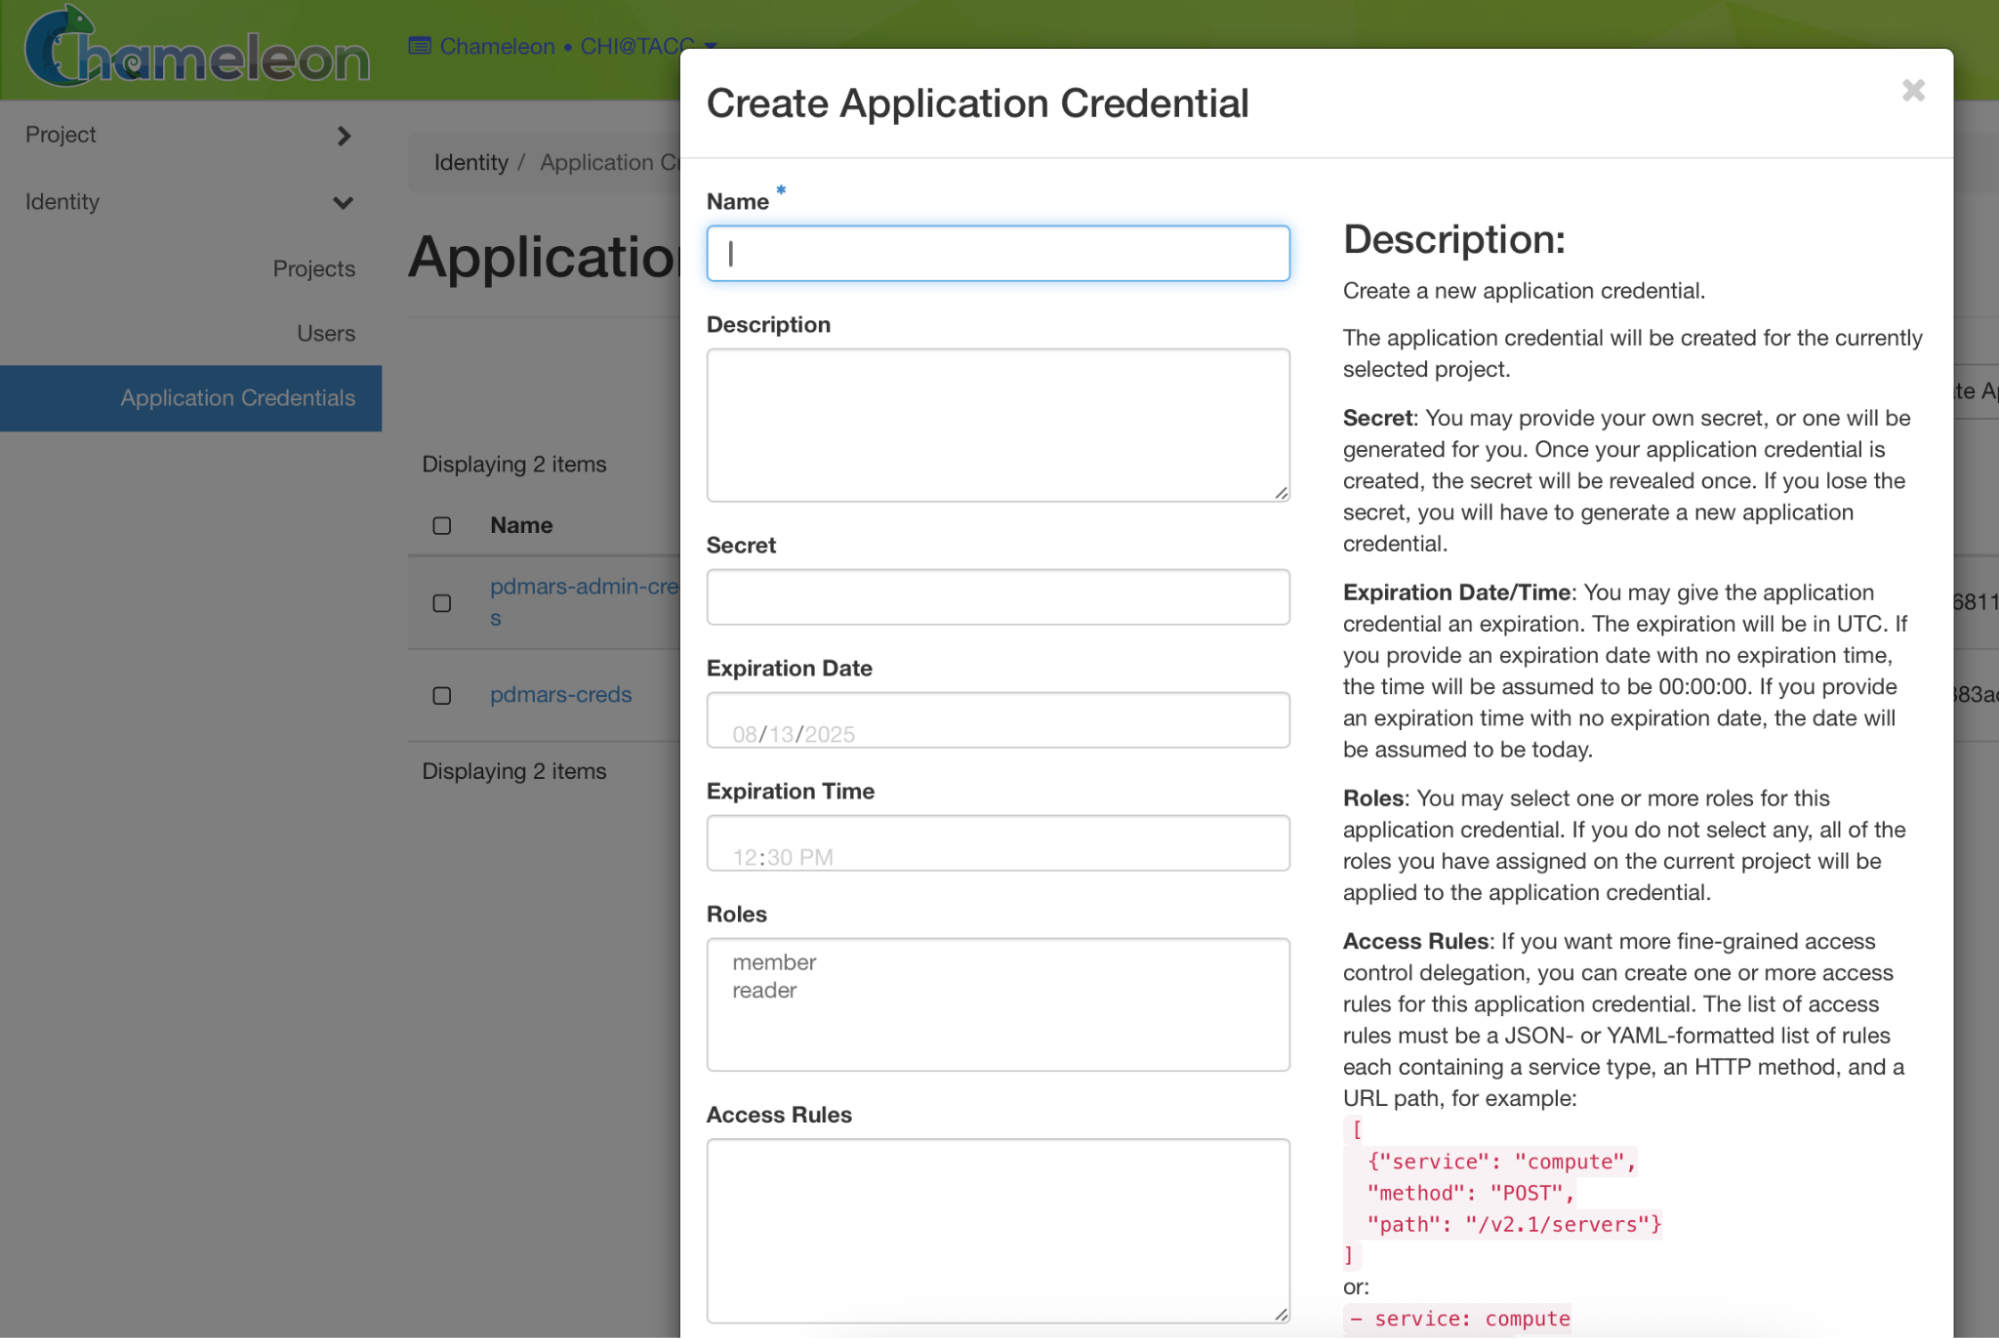
From there you can create a set of application credentials, give it a reasonable expiration date a few months out, and then download the file. You'll want to put the credentials in a file called ~/.config/openstack/clouds.yaml.
That file has a basic format of:
 clouds:
  cloud name:
    credentials
To use the credentials you can set the environment variable OS_CLOUD to the name of the cloud you want to use.
If your file looks like:
 clouds:
  chi_uc:
    credentials
You would set export OS_CLOUD=chi_uc to have your OpenStack clients use those credentials.
Saving Your Data
Now that you're ready to use your instance for your actual research, you'll want to make sure you know how to save your work. Remember, the instance is running with a time-bound lease that will eventually expire. If it expires before you save your work off-instance Chameleon will delete your instance and you'll lose your work! Of course, you can transfer your data off the instance any way you like: copy/paste it, scp it, whatever works. But we've included two built-in methods that make saving your data on Chameleon a breeze.
First, we bundle rclone into the image and which allows you to mount containers from the object store into the home directory of the cc user on boot. The mount point appears in a directory called cc_my_mounting_point from the home directory of the cc user.
To mount a container into that directory you can run:
cc-mount-object-store start your_container_name
Check that the mount is running with:
cc-mount-object-store status your_container_name
List all of your running mounts with:
cc-mount-object-store list
And stop the mount with:
cc-mount-object-store stop your_container_name
If a container is not mounted for some reason there will be an empty file named THIS_IS_NOT_MOUNTED in the directory, letting you know that saving files to that directory won't copy them to the object store. Please keep in mind it is your responsibility to double check that the files you copy into these directories are actually uploaded to the object store and contain the data you expect.
The second method for saving data is to use the cc-snapshot tool that is bundled in the image and lets you take a snapshot of your running instance, saving it as a new image to Glance. Once the image is in Glance you can boot new instances with the image and when they come up they'll have all of your data.

In the Chameleon web interface you can find the images under Compute -> Images and then search for the image with the name you provided
It's important to note that if you have sensitive data you shouldn't make the image public since that will allow any Chameleon user to boot it and access your data. Again, remember to verify your disk images, don’t just assume everything was saved and uploaded as you expect! It’s best practice to verify any data you save to make sure it was saved correctly.
It's typically optimal to use rclone when working on a project with frequent updates or iterations, allowing you to efficiently sync and save your work in a lightweight manner. Creating a snapshot on the other hand is better to capture the entire state of your environment--such as creating a reproducible base for future experiments, sharing a complete setup with others, or solidifying a stable milestone with your experiment.
Trovi Artifacts and Tutorials
After you’ve set up instances for your own work, it may be worthwhile to explore more advanced artifacts and tutorials some of Chameleon’s power users have contributed for the benefit of the community.
Some great examples include other ways of saving your data with persistent storage in the Persistent storage on Chameleon tutorial. There are also examples and tutorials for using Chameleon for machine learning through a variety of tutorials:
- Build an MLOps Pipeline
- Evaluation of ML systems by closing the feedback loop
- Offline evaluation of ML systems
- Online evaluation of ML systems
- System optimizations for serving machine learning models
And some particularly advanced tutorials even cover some of the more exotic aspects of Chameleon using edge devices, specifically, the tutorial: Serving machine learning models on edge devices.
Feedback
With these tips and tricks added to your toolkit you're ready to start the new school year and level up your experience on Chameleon, using it to its full potential for your research. As always, reach out to us at the help desk if you have any questions or run into any problems.
We're looking forward to hearing about all the exciting discoveries from our users this year. Finally, we hope if you dig a bit deeper into Chameleon you’ll consider creating your own Trovi artifacts, whether they’re experiments, tutorials, or other resources, to share with the community!
Data Storage, Management, and Sharing on Chameleon
- Oct. 26, 2022 by
- Zhuo Zhen
Learn about all of the ways you can store your experiment data on Chameleon, including a fantastic new feature: The Shared Filesystem!
Choosing the right orchestration in Chameleon
- May 29, 2020 by
- Mauricio Tavares
As with many projects and programming languages, there is more than one way to achieve a task when orchestrating Chameleon computing and network resources. As a result, experimenters may feel overwhelmed and choose to stick to the orchestration method they are familiar with even when another method might be more effective for the task in hand.
Getting started with Chameleon
- Dec. 11, 2017 by
- Joon Yee Chuah
Are you a first time Chameleon user? In this article, we're going to feature on-boarding videos from Chameleon's YouTube channel. It's a great way of learning how to sign up for an account, reserve hardware and launch and access your first Chameleon instance.
No comments