Managing Persistent Storage with Volumes at KVM@TACC
A guide to creating, attaching, and managing persistent volumes for VMs
- Feb. 17, 2026 by
- Mark Powers
KVM@TACC is Chameleon's virtualized site, where instead of bare metal instances, you can deploy VMs. Last year, we started requiring bounded and advanced reservations at KVM@TACC, and as a result, your VM instances will be terminated when your reservation ends, and all of your data deleted. One option to preserve your instance is via a snapshot, which will create a bootable image based on your running VM that can be used to restore the state, similar to cc-snapshot for baremetal instances.
A snapshot will take the instance's entire filesystem and restore it. If you just want to persist a portion of your VM's files though, such as your experiment scripts or data, it may be easier to use a persistent volume. A volume is a block device that is not tied to a lease, and so you can set one up and keep it around, regardless of if it is tied to your instance.
Creating a Volume Using the GUI
To get started with volumes, make sure you have a running VM and can SSH to it.
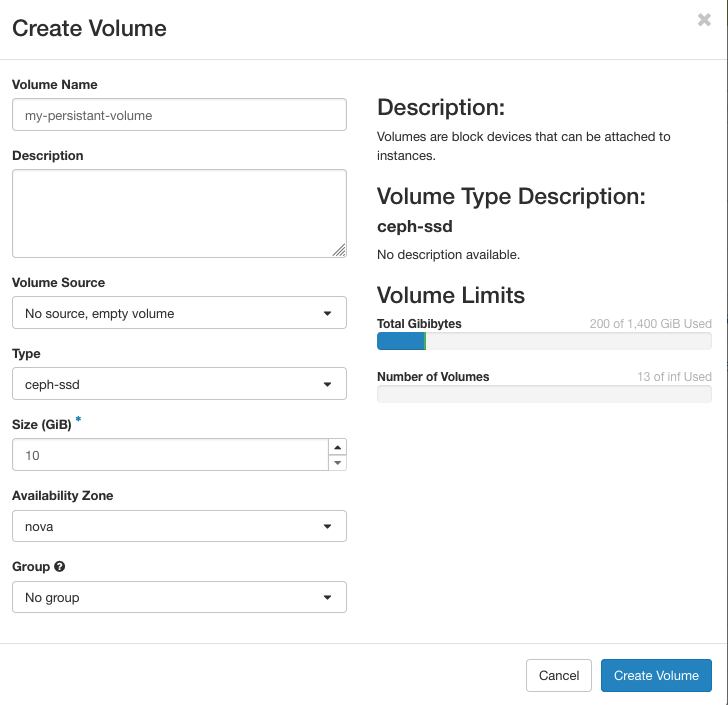
The create volume dialog
First, navigate to the Volume overview from the KVM GUI by selecting "Volumes > Volumes" on the sidebar. Select "Create Volume", which will bring up a dialog like the one in the above image. Enter a name for your volume, and the size in GiB. Additionally, you can also select the type of volume you want to set up. Currently, we have 2 backend types: ceph-ssd and ceph-hdd. The ceph-ssd type is the same storage type as your VM boot disk. The ceph-ssd type is on older storage backed by spinning disks, which may be slower for random access, though we have more of this storage available. Typically, you can leave the volume source as "No source", but you could also create your volume as a copy of another volume or snapshot under the "volume source" option which might be useful if your instance has issues booting or freezes—you can create a volume from that instance's snapshot and manually recover any data. Once all of your options are configured as desired, click the "Create Volume" to confirm.

The "Volumes Attached" section of the instance overview
Now, you need to attach the volume to your instance. Navigate back to the instance overview via "Computes > Instances" on the sidebar. Find your instance in the list, and under the "Actions" column select "Attach Volume". A popup will appear. Select your volume from the dropdown, and confirm with "Attach Volume". Now, if you select your instance, you'll be taken to the instance overview screen. At the bottom of this page, you should see a "Volumes Attached" section with information about the volume. Here, I see that my volume now is mounted as the block device /dev/vdb inside my instance. If I ssh into my VM instance, I now see that block device appears.
cc@mark-volume-test-1:~$ lsblk
NAME    MAJ:MIN RM  SIZE RO TYPE MOUNTPOINTS
vda     253:0    0   40G  0 disk
├─vda1  253:1    0  550M  0 part /boot/efi
├─vda2  253:2    0    8M  0 part
└─vda3  253:3    0 39.5G  0 part /
vdb     253:16   0   10G  0 disk
Using the Volume
If you want to store files in the new, empty volume, we'll need to partition the device, format it, and mount it. If you are not starting from an empty volume, skip the partition and formatting steps.
Here is one way to do this tested on Ubuntu 24.04, though the specifics may depend on your needs and your operating system. Additionally, this assumes your device is also attached to /dev/vdb.
Creation the partition:
sudo parted -s /dev/vdb \
  mklabel gpt \
  mkpart primary ext4 0% 100%
Format it
sudo mkfs.ext4 /dev/vdb1Mount it to /mnt/data
sudo mkdir -p /mnt/data
sudo mount /dev/vdb1 /mnt/data
Here is the output from my instance
cc@mark-volume-test-1:~$ sudo parted -s /dev/vdb \
  mklabel gpt \
  mkpart primary ext4 0% 100%
cc@mark-volume-test-1:~$ sudo mkfs.ext4 /dev/vdb1
mke2fs 1.47.0 (5-Feb-2023)
Discarding device blocks: done
Creating filesystem with 2620928 4k blocks and 655360 inodes
Filesystem UUID: 4e628394-53a2-4867-a806-6889f22ebf07
Superblock backups stored on blocks:
        32768, 98304, 163840, 229376, 294912, 819200, 884736, 1605632

Allocating group tables: done
Writing inode tables: done
Creating journal (16384 blocks): done
Writing superblocks and filesystem accounting information: done

cc@mark-volume-test-1:~$ sudo mkdir -p /mnt/data
sudo mount /dev/vdb1 /mnt/data
And now, we can see this reflected in lsblk.
cc@mark-volume-test-1:~$ lsblk
NAME    MAJ:MIN RM  SIZE RO TYPE MOUNTPOINTS
vda     253:0    0   40G  0 disk
├─vda1  253:1    0  550M  0 part /boot/efi
├─vda2  253:2    0    8M  0 part
└─vda3  253:3    0 39.5G  0 part /
vdb     253:16   0   10G  0 disk
└─vdb1  253:17   0   10G  0 part /mnt/data
Now, I can write up to 10GB of data to the /mnt/data directory, and it will be stored in my volume, rather than the instance's boot disk.
Extending the Volume
Please keep in mind when creating volumes that Chameleon has a shared pool of storage for all users, so only use as much space as you actually need. However, if you find that you need more storage than you initially set up, it is easy to extend an existing volume.

Navigate back to the volume overview by selecting "Volumes > Volumes". Under the "Actions" column for your volume, select "Extend Volume" which will bring up the above window. Enter the new volume size as desired.
cc@mark-volume-test-1:~$ lsblk
NAME    MAJ:MIN RM  SIZE RO TYPE MOUNTPOINTS
vda     253:0    0   40G  0 disk
├─vda1  253:1    0  550M  0 part /boot/efi
├─vda2  253:2    0    8M  0 part
└─vda3  253:3    0 39.5G  0 part /
vdb     253:16   0   20G  0 disk
└─vdb1  253:17   0   10G  0 part /mnt/data
My instance automatically picked up the disk change, and /dev/vdb appears as 20G. In order to use this space, we need to update the partition, and update the filesystem:
sudo growpart /dev/vdb 1
sudo resize2fs /dev/vdb1
Here is the output from my instance after running these commands. Now lsblk shows that my partition is the full 20GiB.
cc@mark-volume-test-1:~$ sudo growpart /dev/vdb 1
sudo resize2fs /dev/vdb1
CHANGED: partition=1 start=2048 old: size=20967424 end=20969471 new: size=41940959 end=41943006
resize2fs 1.47.0 (5-Feb-2023)
Filesystem at /dev/vdb1 is mounted on /mnt/data; on-line resizing required
old_desc_blocks = 2, new_desc_blocks = 3
The filesystem on /dev/vdb1 is now 5242619 (4k) blocks long.

cc@mark-volume-test-1:~$ lsblk
NAME    MAJ:MIN RM  SIZE RO TYPE MOUNTPOINTS
vda     253:0    0   40G  0 disk
├─vda1  253:1    0  550M  0 part /boot/efi
├─vda2  253:2    0    8M  0 part
└─vda3  253:3    0 39.5G  0 part /
vdb     253:16   0   20G  0 disk
└─vdb1  253:17   0   20G  0 part /mnt/data
Further Usage
If you prefer to use the CLI for managing volumes, see the OpenStack Cinder documentation. Python-chi has Volume support (see this Trovi artifact for a notebook example).
The steps above for mounting your device assume that it is always located at /dev/vdb. If you have multiple volumes attached to your instance, you can't assume the block device name. Additionally, if your instance reboots, you'll need to remount the volume. One solution to this is to use fstab to automatically mount your device by UUID.
As mentioned before, you create a volume from an instance snapshot, which can be used in case your instance has problems to recover its data. You could use this feature to export data from a cc-snapshot image, by downloading it from the baremetal site and uploading the image to KVM@TACC before creating a volume.
Bare Metal or KVM? Which Should You Choose and When
A detailed comparison of hardware access, reservation systems, and storage options for users
- Oct. 21, 2025 by
- Mark Powers
Not sure whether to use bare metal or KVM for your next Chameleon experiment? You're not alone. With KVM's recent addition of H100 GPUs and advance reservations, the choice isn't always obvious. This comprehensive comparison walks you through the practical trade-offs: when you need the isolation of bare metal for accurate benchmarking, when KVM's 6-month leases and resource sharing make more sense, and how to navigate the different storage and networking options. Make informed infrastructure decisions that accelerate your research.
Storage Research Experiment Patterns on Chameleon Cloud and Trovi
- April 18, 2023
Today, two UChicago students share with us their thoughts on how to create reproducible experiments in a cost effective manner. Ray Sinurat and Yuyang (Roy) Huang talk about the experiment patterns for storage experiments they created and describe how they can serve as a basis for developing storage experiments. Best of all – they share the experiment patterns with the Chameleon community – we hope you will find them useful!
Data Storage, Management, and Sharing on Chameleon
- Oct. 26, 2022 by
- Zhuo Zhen
Learn about all of the ways you can store your experiment data on Chameleon, including a fantastic new feature: The Shared Filesystem!
No comments